.jpg)


Seneca Special Features
Magneto Switches
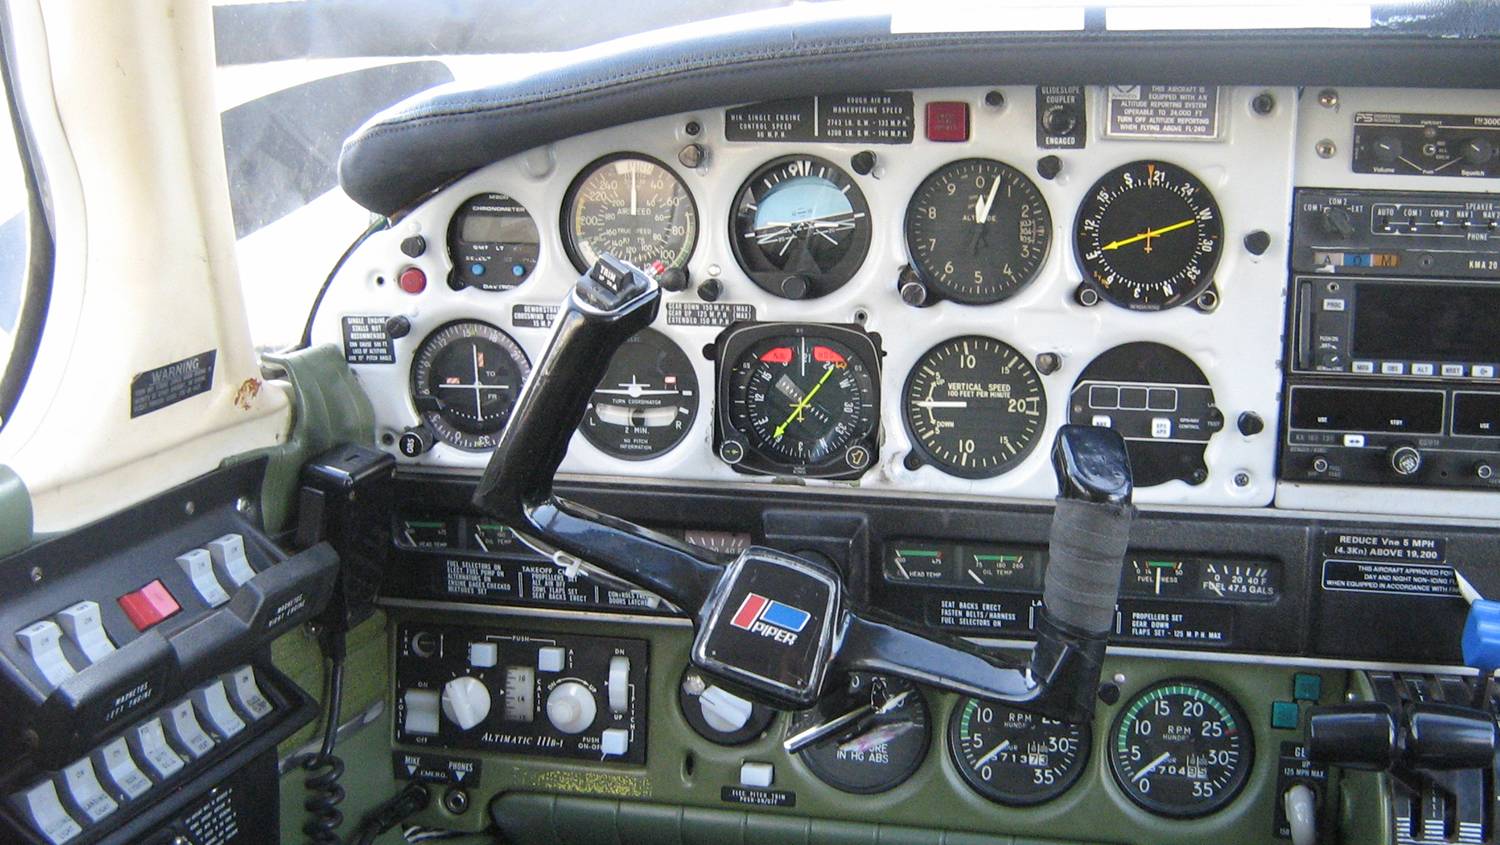
There is an important safety consideration in working around the Piper Seneca, and it relates to the fact that a key is not required to activate the engine magnetos. Instead, there are simply four magneto switches on the top of the left-hand electrical panel.1 As there is no key, there is no means, therefore, of visually confirming that the magnetos are in fact turned off when glancing at the aircraft—looking for the keys on the dash, as you are probably used to with single-engine aircraft. Instead, we will only know that the magnetos are safely off if we visually check the four switches which, because of their location, are hard to see from outside the cockpit. It is crucial that those switches be checked prior to working around the aircraft.
Initial Cockpit Checks
Before you do a pre-flight inspection of the Seneca, be sure you first begin with the initial “cockpit checks.” These appear on the Pilot Checklist and must be completed prior to performing the walk-around. Each of these items has an important purpose and, like any of the checks on any checklist, none should be skipped. Included here is a check of the gear status indications (three green lights), and a check of the electric fuel pumps.
Mixture Controls
It is worthwhile noting that you should never advance the mixture controls with the master switch and fuel pumps selected ON. If this is done, the pumps will immediately proceed to empty the fuel tanks onto the floor of the hangar via the cylinders and exhaust pipes—fuel everywhere will of course result in a nasty fire hazard. When the electric pumps are pressured up during the “cockpit checks,” the mixtures must be at idle cut-off.
Gear Switch
Always remember that before the master switch is turned ON you must check to be sure that the gear handle is in the DOWN position; if the master is turned on with the gear selector UP, then we are simply relying on an unsophisticated squat switch which is supposed to deactivate the electric hydraulic pump controlling gear movement. Never rely on this switch to save your bacon.
Nose Compartment
You will notice that the key for the nose compartment hatch cannot be removed from the keyhole unless the latch is secured and locked. This is to provide extra safety in ensuring the nose baggage hatch does not inadvertently come open during flight because the pilot has forgotten to lock the hatch—many a fatal accident has occurred owing to the hatch unexpectedly opening during flight. Should this ever happen, the pilot must concentrate on continuing to fly the aeroplane and maintaining normal flying speeds. I can recall two separate accidents related to hatch openings. In one case the pilot aborted a takeoff and ploughed into a fence at the end of the runway. In the other case, the pilot became distracted and fatally stalled the aircraft. In both cases, the hatch came open; it is because the key lock was worn and the pilots were able to remove the key with the hatch unlocked.2
While in the nose compartment, you must visually check the brake hydraulic fluid level in the system’s reservoir that is mounted on the rear bulkhead. You will quickly learn the importance of effective braking at Langley Airport as the runways provide little if any margin for malfunctioning brakes.3 The hydraulics for the gear system is separate from the brake hydraulic system. The reservoir for the gear pump is located at the front of the nose compartment (next to the battery) behind a bulkhead, and this cannot be readily checked before flight. If there is a hydraulic leak near the reservoir of either system, this is likely to be (but not in all cases) detected by smell—the sweet “oily” smell of hydraulic fluid.
Check also the security of items stored in the nose compartment—normally the portable tow bar4 and the survival kit.5 Incidentally, be aware of the weight restrictions for the nose compartment.6
In the nose compartment you will also find a bucket; this is used to catch fuel that is drained from the cross-feed sumps that are underneath the fuselage (better to catch the fuel released by those sumps rather than allow the fuel to drain on to the asphalt). Be sure that all fuel residuals remaining in the bucket have evaporated prior to returning the bucket to the compartment. Also, do not leave any un-sealed oil containers in the nose compartment that might leak—the nose compartment is normally where the luggage and other personal items are stored during flight, and it should be kept reasonably clean.
In addition to the weight restrictions noted above, note that heavy items stored in the nose compartment should be secured on either side of the nose gear wheel-well (and not over the wheel-well itself). The wheel-well bulkhead is only thin fibreglass and cannot support excessive weight, while either side of this is reinforced.
Oxygen Bottle
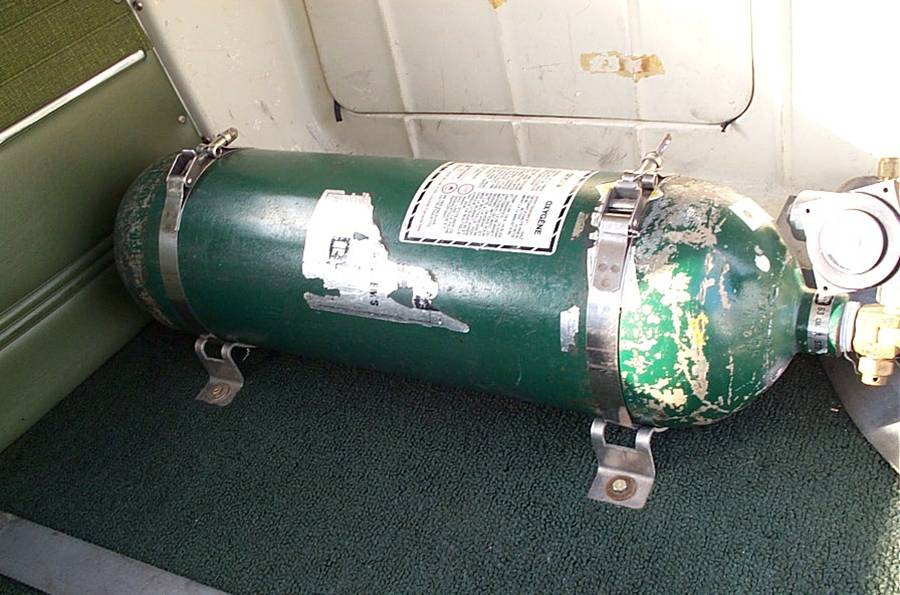
Pre-flight inspection of the aircraft must include a check for security of the oxygen bottle, located in the cabin behind the rear row of seats. This baby is a potential bomb, so you want to be sure the bottle and the safety wiring are secure.7
Rear Cargo Door
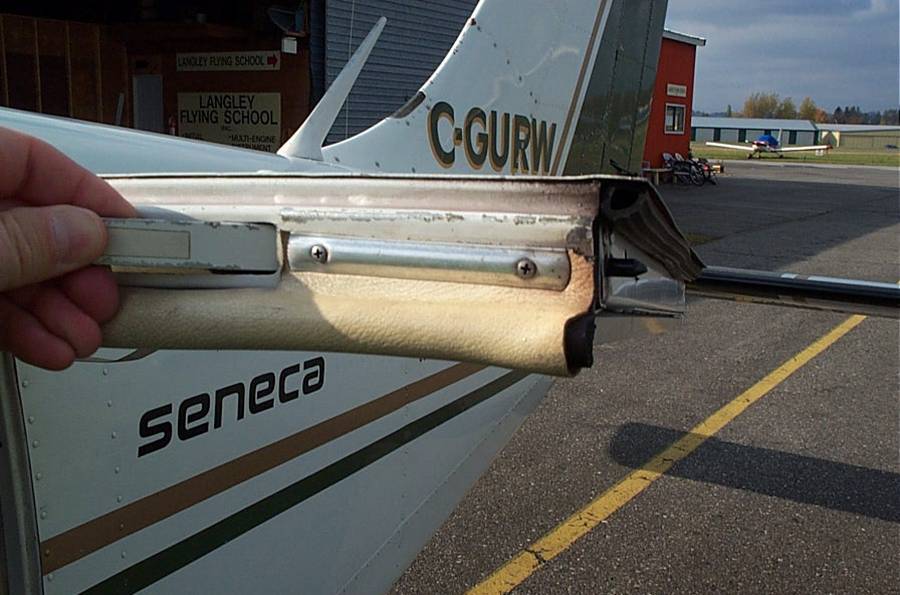
The oxygen bottle is actually mounted in the rear cargo compartment, and a locking pin secures the cargo door used to access this. After the oxygen bottle has been inspected, and any cargo secured back here, care must be used to ensure the access door is properly secured. Only a single pin holds the door in place, and a lever at the side of the door controls movement of the pin. The pin has to be retracted as the door is closed—or of course it will slam against the outer skin. When you release the pin after the door is closed, give the door a tug to ensure the pin is securely in place. Note the weight limitations for the rear cargo area.8
Unoccupied Seats
In the cabin you must also ensure that the seat belts are tightly fastened on all unoccupied seats, as the belts are the only means of keeping the seats secure, and it would not be a good thing to have a seat flying around the cabin in the event that significant turbulence is encountered.9 Note that only the lap belt is required for this, and the passenger shoulder harnesses of unoccupied seats are held in place by snaps located above the side windows.
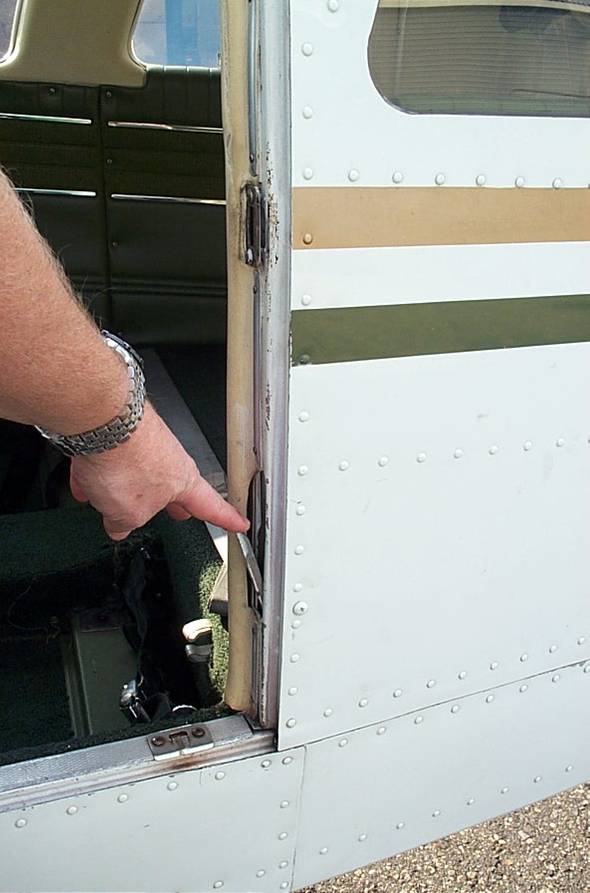
Rear Passenger Door
Note that two latches open the rear passenger door, the first is a normal door latch similar to that found in an automobile, and the second is a upper latch-handle that must be rotated in place. Passengers must of course be briefed on the correct operation of the door, and the briefing must include a practice opening and closing of the door. The pilot must supervise the securing of this door prior to engine start-up. After the door is closed, firm pressure must be exerted to ensure the locking pins are properly engaged into the door frame.
Engine Cowling and Nose Compartment Security
Special consideration must be given to ensuring that the engine cowlings are properly secured after engine inspection. The latches are in fact of very poor design—a visual inspection of the latches might not reveal that one is in fact not properly secured. For this reason, the pilot, as a final act prior to getting on board the aircraft for start-up, must physically inspect for security the four latches on each engine. The same “double check” must be applied to the nose compartment and the rear cabin door—prior to boarding the pilot must physically ensure the various latches are properly secured.10
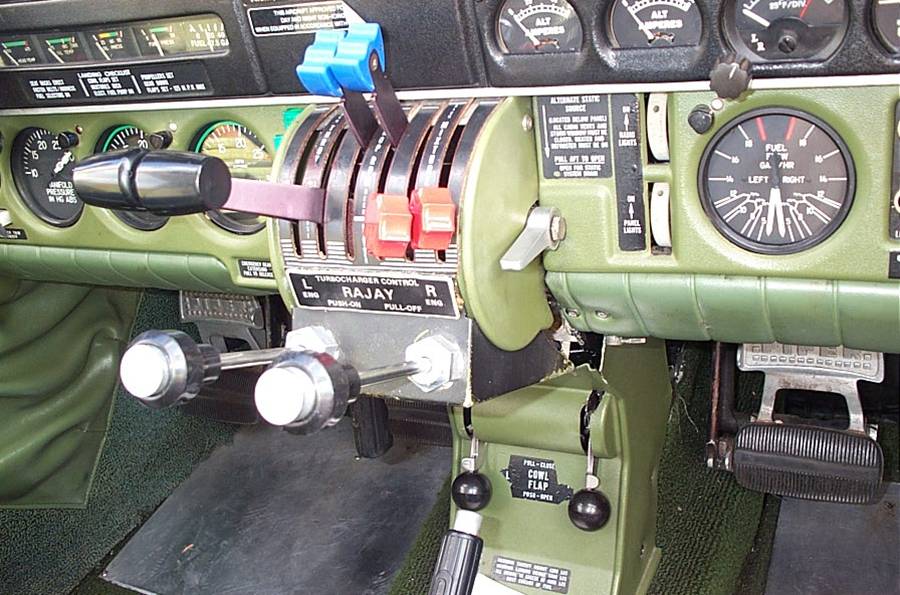
Gear Doors and Cowl Flaps
While conducting a pre-flight inspection of the airframe, be sure to check the security of the gear doors and cowl flaps—they take a lot of abuse behind the prop-wash of the engines. The gear doors and the cowl flaps are always covered in oil from the engines, so it will be messy. Physically check the security of the gear doors and cowl flaps to ensure they won’t land in someone’s backyard during flight.
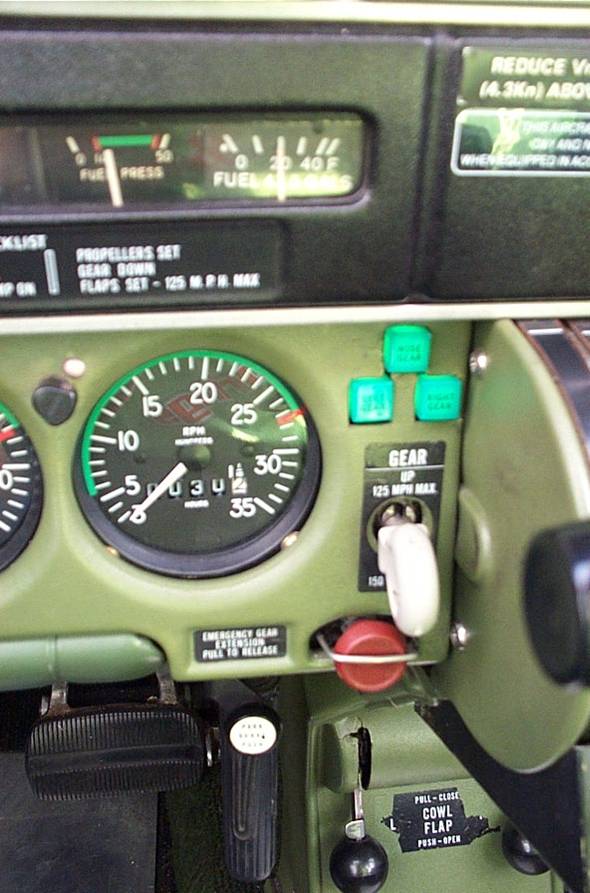
Landing Gear
There are some important operational rules you must be aware of considering the landing gear for the Seneca. First, remember that gear operations are strictly limited by speeds. The speed for gear extension is quite high—150 MPH—and this high speed requires that caution be used to ensure the aircraft is slowed to below this limit prior to extension. A good rule to follow is to always check the airspeed indicator prior to extension, saying “gear speed—gear down.” Because of the high limiting speed, however, the gear system is also a useful tool in slowing the aircraft during a deceleration in the air. This is perfect for producing descents for landing from the downwind leg, and therefore the extension of the gear is the first action when beginning a descent for landing, whether in the base leg, or on final approach (with a straight-in clearance).
Gear retraction is a totally different matter—the speed that limits the gear retraction is extremely low—only 125 MPH. As you will see, the aircraft will quickly accelerate over this speed unless the climb pitch of 10° is maintained after takeoff. The rule, then, is that you must not retract the landing gear above 125 MPH (white arch on the ASI)—if you retract the gear beyond this limiting speed you risk gear damage.11 The procedure to ensure this is simple—be sure to maintain a proper climb pitch of 10° nose-up after rotation, which will keep the aircraft from accelerating out of the white arch of the ASI.
Another important rule concerns the reversal of the movement of the gear while it is in transit. To ensure the gear hydraulic/electric pump is not damaged, never select gear-up while the gear is in the process of being lowered and locked, and never select gear-down when it is on its way up. Wait until the cycle is completed before recovering the gear. The sudden reverse movement on the system can cause damage.
Proper ground handling of the aircraft is equally important. Many gear-up landings in the Seneca model have occurred as a result of over-extending the turning radius of the nose gear during ground movements—usually occurring when a tug (tractor) is used to tow the aircraft. The use of a tug whose pull-bar locks into the tow-bar rings on the side of the nose strut must be strictly forbidden. Fortunately, most tugs use a “plate” which slides under the nose wheel and physically raises the nose gear and allows it to rotate on the plate—with this machine the nose-gear strut itself is not torqued. Whenever using FBO services where movement of the aircraft might occur without your supervision, be sure ramp personnel are briefed on your requirements for safe towing.12 How nose-gear failures usually occur is that the strut has been strained beyond the 27°-arch permitted either side of centre.13 Over-extension beyond the permitted turning radius has the effect of derailing the gear from the track that is followed as the nose gear is retracted into the wheel well. Be sure, then, to get down and inspect the structure of the nose gear during the pre-flight inspection to be sure that damage has not occurred from ground handling.
A last note which has already been covered pertains to the importance of properly checking the cockpit indications for the gear—ensuring that all three green indicating lights for the gear are lit up. If there is a light-bulb problem, you want to be aware of it prior to launching, since such information would be critical to troubleshooting a gear problem in the air.
References:
1 Just below the pilot side-window.
2 Misguided attempts to remove the key will damage this safety feature.
3 Hence the importance of a brake-check (for pressure) prior to landings.
4 This tow bar must be secured under the tie-down straps—the straps do not immobilise the tow bar, but they will at least ensure it will not thrash about in heavy turbulence.
5 The large blue plastic box.
6 See p. 2-28 of the Seneca Pilot Operating Handbook (POH).
7 The black “tap” handle, prominently mounted on the top of the bottle, pressures up the line that runs under the floor boards to a distributor located in the centre and slightly aft of the two pilot seats. The flow of oxygen is “regulated” by ambient cabin pressure so that the higher the ambient pressure, the more pure oxygen is released into the line for distribution. The supply of oxygen cannot be specified by a precise time—say “three hours” of oxygen—because this of course varies with the altitude of the aircraft and the number of person drawing from the bottle. Three persons at 19,000’ will consume approximately 90% of the supply in 2 ½ hours, the same number drawing for a similar time at 12,000’ will consume about 50%. The oxygen masks have “re-breather” bags into which the oxygen flows, and a positive means of checking for flow is to cover the outlet into which the oxygen enters the mask from the bag, observing for bag expansion. As well, the hoses that are attached to the mask have positive-flow indicators (green indicates flow), which can also be checked. It’s important to ensure the tap handle is properly turned off after a flight in which oxygen is used, so as to preserve the remaining supply—a fill-up of the tank can cost between $50 and $75, and this can only be done at a prominent FBOs at larger airports.
8 Again, p. 2-28 of the POH.
9 Because of the speed of the Seneca, any turbulence is magnified in effects on both passengers and cargo in the cabin—note the rather restrictive Va speeds that appear on p. 3-2 of the POH.
10 The nose compartment and rear cabin doors cannot be accessed by the pilot during flight.
11 Gear damage could result in a gear malfunction and the needless risks of having to do a gear-up or partial gear-up landing.
12 Be sure to find out what kind tug FBO personnel will be using.
13 See p. 2-6 of the POH.
S