.jpg)


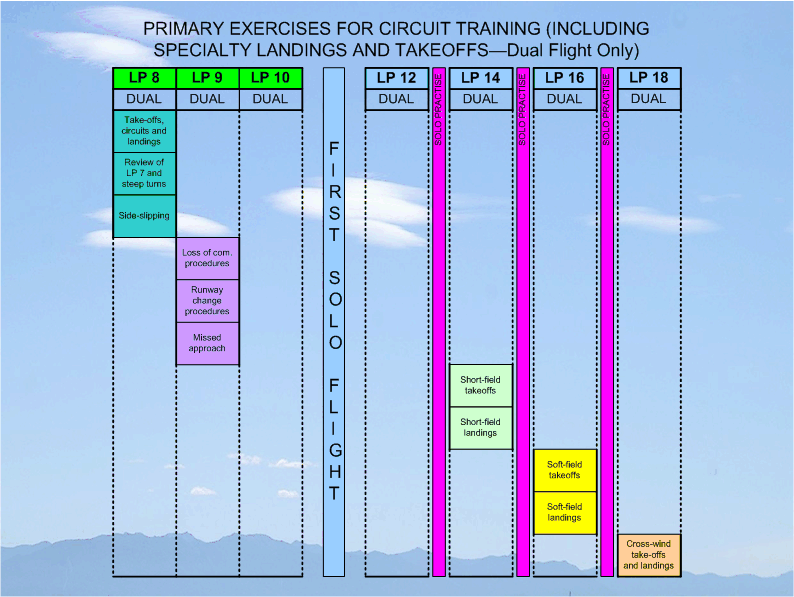
Primary Exercises for Initial Circuit Training
The question arises as to how takeoff and landing training is administered by Flight Instructors, and the answer is “right from the start”. I would be considered a waste of student money if a takeoff or landing opportunity did not engage the student in the learning process. Transport Canada’s Flight Instructor Guide has a formal listing of active takeoff and landing training as describe below, but these entries in the Lesson Plan table format fails to capture the practical methods of training commonly used by Instructors.
The question arises as to how takeoff and landing training is administered by Flight Instructors, and the answer is “right from the start”. I would be considered a waste of student money if a takeoff or landing opportunity did not engage the student in the learning process. Transport Canada’s Flight Instructor Guide has a formal listing of active takeoff and landing training as describe below, but these entries in the Lesson Plan table format fails to capture the practical methods of training commonly used by Instructors.
Task Sharing during Takeoffs and Landings
The most commonly practice means of training students during takeoffs and landing is to share the tasks required to complete these operations. The pilot inputs for takeoffs, for example, can be divided in throttle, control column, and rudder tasks, and the same grouping can be applied to landings. Start from simple to complex.
Teaching Takeoffs
In the case of takeoffs, the student is first assigned the throttle—after aligned on the centreline and after receiving a clearance for takeoff if applicable, moving the throttle smoothly from idle to maximum power, as well as guarding the throttle lever during the initial phase of departure. For the next takeoff, the student is assigned the rudder pedals—they are told that, as the Instructor increases power smoothly for takeoff, they must use the bottom of the rudder pedals to maintain the centreline, and that the aircraft will tend to drift to the left. If all goes well, students are assigned the control column during the takeoff—they are told he proper pitch position of the control column at the start of the takeoff roll (just aft of the neutral position so that the aircraft climbs away on its own when it is ready), and the proper aileron input at the start of the takeoff roll (compensating for a crosswind if applicable).
Teaching Landings
In the case of landings, the same tasks can be assigned, but the sequence is somewhat altered. The initial approaches should be initiated from a straight-in position as far back from the threshold as practically possible and initiated on the correct glidepath (higher than standard circuit altitude if the final approach is extended). The landing configuration should be established by the Instructor immediately upon final approach interception so as not to waist precious glidepath time—this includes flaps, power and speed, and most importantly, the aircraft must be properly trimmed to maintain the final approach speed. The Instructor should confirm the student has the runway in sight before initiating the task sharing. The student should then be asked to identify the “piano keys” so as to have a working aim point at the bottom of the glidepath. Now the student takes on the task.
Speed Control on Final Approach
Beginning with the control column task, the Instructor first points out the gap that appears between the aircraft glareshield and the runway piano key—the student is then assigned the task of maintaining that gap on approach, which is of course speed control, and maintaining the extended runway centreline. Meanwhile, the Instructor is methodically adjusting the power to maintain a proper glidepath, and adjusting yaw with rudder so as to maintain the nose aligned with the centreline. Very cues are passed to the student as required. When the runway numbers become visible to the student, these become the new aim point. As the aircraft nears short final, the Instructor explains how soon the numbers will disappear under the aircraft, at which point we fixate our eyes on the far end of the runway tarmac right through to touchdown, and at the same time, we will move the aircraft this approach attitude to the cruise attitude. That’s all you have time to say. As the runway nears and it become necessary to initiate the flare rotation, the instructor inputs as necessary to conduct the flare and touchdown, while the student follows through on the controls. The student must simply learn to match the pressure and timing used by the Instructor, and this basic learning format is repeated during subsequent landings as the student get closer and closer to matching the Instructor inputs.
Glidepath Control on Final Approach
While the student will return to working the control column, the next assigned task is aircraft throttle. The Instructor explains that the throttle controls the aircraft’s glidepath on final approach, as well as the proper response to the visual clues of begin high and low. Beginning this drill from a long straight-in final approach will allow for a simple drill whereby the student is required to correct glidepath deviations induced by the Instructor.
Yaw Control on Final Approach
The final task assignment is the rudder pedals. Here the student learns to keep the aircraft longitudinal axis aligned with extended runway centreline throughout the final approach, continuing to touchdown and rollout. The positioning of the feet on the pedal surfaces should be reviewed to ensure the brakes are not applied during flight. A simple but affective drill in this case is simply for the student to practice positioning the long axis left of centreline, then back on centreline, then right of centreline, then back on centreline, repeating this oscillation for a time so as to get a feel for cause-effect concerning rudder pedal inputs.