.jpg)


GENERAL PROCEDURES FOR INSTRUMENT APPROACHES
Whether flying a precision or non-precision approach, the goal of the pilot is to establish the aircraft on the published final approach course heading inbound to the runway, but outside the FAF. There are two ways to get there, the first is by ATC vectors, whereby the pilot is provided with a series of headings to fly that eventually lead to interception of the final approach course, and the second is by way of a procedure turn, whereby the pilot essentially self-navigates to the final approach course. These two methods will be introduced below, but let us first examine a few general features and concepts related to flying the final approach course during an instrument procedure.
ILS
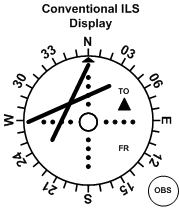
The cockpit display used to fly the ILS functions similar to a VOR display, but instead of providing lateral reference to a radial, the lateral reference on an ILS display provides position information for a localizer. The needle displacement and the pilot interpretation of a localizer signal are virtually identical to VOR, but there is an important difference—the sensitivity of a localizer needle.
While full deflection of a VOR needle (from dead centre to one side) equates to 10°, the same deflection for a localizer is 2.5°—now that is tight! So remember, when you are tracking down a localizer, it doesn’t take a lot of heading change to create movement in the localizer needle.
A second difference between the localizer and VOR display is the presence of the glidepath indicator, which provides vertical reference on an ILS. Now if you thought localizers were sensitive, wait until you hear about glideslope sensitivity—full deflection of a glideslope needle (from dead centre to either full up or full down is .7°! Gone are the days of needle chasing—if you try to chase these sensitive needles, you’ll be zigzagging all the way down to the threshold (and even then there is a good chance you won’t see it!). With the localizer, you simply apply your skills of VOR navigation, but the key is to make small gentle heading corrections that focus on trends, rather than movement. Slowly work the localizer to the bull’s-eye, and then concentrate on flying the heading that will produce a steady indication. Visualize the runway ahead of you (on the attitude indicator) and keep the wings level. Added to this, however, is the vertical dimension—the glideslope.
The key to “riding the slide” is relating the attitude indicator to the vertical speed indicator. The attitude indicator reference will require that you recognize the difference between 1° down-pitch and 3° down-pitch—you have to be very exact in your pitch control of the aircraft via this instrument. What you do with the attitude indicator, however, is based on vertical speed indications. Most glideslope projections are 3°. This is the standard. If you do the math (or if you simply read a Jeppesen approach plate), you will know that an aircraft with a forward speed of 80 MPH will have to maintain a vertical speed value of 375’/min. to maintain a 3° glideslope in calm wind conditions. The vertical speed indicator, therefore, becomes the trend instrument. If the glideslope needle remains on the bull’s-eye with 375’ on the vertical speed indictor, then the current pitch placement on the attitude indicator is working and should be kept there. If, however, the glideslope needle begins to migrate upward, meaning that you are descending below the glideslope, then you know that pitch must be adjusted. Raise the pitch dot on the attitude indictor to decrease the value of the vertical speed indicator—instead of descending at 400’/min., decrease this to 200’/min. Be sure to hold the pitch dot steady so as to produce steady indications on the vertical speed indicator. Apply the same bracketing method you used in ADF and VOR tracking—if the glideslope needle begins to migrate downward as a result of your adjustment, apply ½ the value—maintain a vertical speed of 300’/min. The key is to produce steady vertical speed indications. If the vertical speed is continually fluctuating, it is difficult to be systematic in your adjustments of the attitude indicator.
Just a final note on the initial interception of the final approach course. Remember that when you are anticipating an intercept, your complete attention must be on looking for the initial migration of the localizer needle. The needle will migrate quickly owing to the sensitivity of the instrument, so this is not the time to have other simultaneous tasks, such as a prelanding checklist, or adjusting radio frequencies. You must be focused at this phase. As you rollout on the final approach course, be wind smart—by this, we mean that if you anticipate the winds from right to left, place the heading of your aircraft accordingly. If the winds are aggressive, use aggressive wind corrections, especially when you are flying at lower speeds.
NDB
With respect to non-precision NDB approaches, you will have had lots of practice in NDB tracking, and there is not a lot that can be added with respect to navigating the final approach course for a NDB instrument approach. Remember that during the intermediate segment (outside the FAF), your job is to continuously push the head to the final approach course indicated at the top of the ADF display. In contrast, once you have crossed the FAF into the final segment (with the NDB located behind you) your job is to pull the tail to the final approach course.
NDB tracks are difficult to intercept—it requires more instrument interpretation than is the case with an ILS or localizer approach. The key is to keep the wings level and steady when you are on the verge of intercepting the final approach course. If the wings are not steady, a turning error (known as bank error) will produce erroneous needle indications. Also, as you approach the FAF, resist the urge to chase the needle—realize that you are near the station, and hold the heading that you have proved works. This also applies to any correction made inside the FAF. Keep in mind that once you have passed the NDB transmitter, the runway is only about 4 NM away—again, rely on your proven heading.
GPS
In the case of GPS approaches, the radio navigation skills are virtually identical to VOR tracking skills. Be aware that the GPS automatically sequences through the waypoints that make up a dedicated GPS approach procedure. Be sure you are able to interpret distances that are defined positions at which descents can be established. GPS can also be used to “overlay” an existing non-precision approach, such as the NDB 07 Approach at Abbotsford Airport.
Procedures
Here is a summary of procedures during final approach course interception.
|
Phase |
Precision Approach (ILS) |
Non-precision Approach (NDB, LOC, GPS) |
|---|---|---|
|
Nearing Final Approach Course Interception |
Maintain 80 MPH (Cherokee) with 0° flaps. Focus solely on the instrument panel, watching for localizer movement. The glideslope indicator should be above you; if it is below, you have intercepted the final approach course too close to the FAF, and a descent will be required (be sure to monitor your altimeter to ensure you adhere to published altitude minima). When the localizer begins to migrate toward the bull’s-eye, immediately start a smooth standard rate turn on to the final approach course. Adjust your rate of turn to the movement of the localizer. |
Maintain 80 MPH (Cherokee) with 0° flaps. Focus solely on the instrument panel, concentrating on keeping the wings level. When the bearing indicator shows you are within 10° of the final approach course, begin a steady standard rate turn to the on course. Don’t try to interpret the needle during the turn. Instead, roll level on the desired heading, steady the wings, and then interpret the needle position for any track adjustments that may be required. The interception of the final approach course using only a localizer will be the same as for the ILS |
|
Once established on the final approach course |
Maintain your altitude (unless ATC advises otherwise) and await the glideslope. |
Descend to the FAF crossing altitude (unless ATC advises otherwise). Reduce power as required (depending on the altitude of the aircraft upon interception), and set flaps to 25°. Maintain 80 MPH. |
|
Upon glideslope interception. |
Reduce power approximately 200 RPM, and set flaps to 25°. Pitch forward to positively initiate the descent, seeking to produce a VSI reading of approximately 400’/min. Maintain 80 MPH. |
Not applicable. |
|
Upon reaching FAF crossing altitude. |
Not applicable. |
Apply power sufficient to maintain 80 MPH. Do not descend below the FAF crossing altitude. |
|
Upon reaching the FAF. |
Confirm that the altitude of the aircraft during the FAF crossing corresponds with the altitude of the glidepath over the FAF as published on the approach plate. The sequence is “TIME, GEAR (if applicable), POWER, TOWER.” The timer is started to backup your estimated distance from the runway threshold. Power is not changed. The descent remains stabilized. Report “beacon inbound” to the tower controller. All cockpit tasks—such as prelanding checks and passenger briefings—must be completed prior to arriving at the FAF. |
Begin the sequence “TIME, GEAR, POWER, TOWER.” The timer is started to estimate your position to the threshold, and hence the time at which a missed approach procedure—if necessary—be started. Reduce power aggressively but smoothly to descend to the published MDA. Maintain 80 MPH and 25° flaps. Report “beacon inbound” to the tower controller. In the case of a GPS approach, report the position using the name of the FAF waypoint—“ABC is KLUCK inbound.” All cockpit tasks—prelanding checks, passenger briefings—should have been completed. |
|
Upon reaching the MDA |
Not applicable. |
Add sufficient power so as to accurately maintain the aircraft at or slightly above the MDA. Never descend below the MDA. Stabilize the aircraft and monitor tracking. |
|
One minute back from the threshold |
Not applicable. |
Call “one-minute back,” indicating that you would begin periodic visual checks for the runway (in simulation under the hood, keep your eyes down). When (or if) your Instructor calls “visual” you may remove the hood and transition to VFR flight. |
|
100’ above DH |
Call “one hundred feet above,” indicating that you are preparing to visually check for the runway. When (or if) your Instructor calls “visual” you may remove the hood and transition to VFR flight. |
Not applicable. |
|
In the event of circling |
Maintain the circling minima published for the ILS approach (which will be much higher that the DH published for the approach. Level off as you would for an non-precision approach MDA, maintaining 80 MPH with 25° flaps. Manoeuvre the aircraft within 1.3 NM of the nearest runway, and be sure to adhere strictly to the published altitude. Avoid levelling the wings—keep the manoeuvring circular and not square, using a banked attitude with the inside wing lowered. |
Level off as you would for the MDA. Manoeuvre the aircraft within 1.3 NM of the nearest runway, and be sure to adhere strictly to the published altitude. Avoid levelling the wings—keep the manoeuvring circular and not square, using a banked attitude with the inside wing lowered. |
|
When to initiate a missed approach |
When DH is reached without visual reference to the runway. |
With the estimated time to the published missed approach point is reached without visual reference to the runway. |
|
In the event of a missed approach |
Immediately initiate the climb. Follow the published missed approach procedures and complete the necessary checklists. Advise the Tower of the “missed approach.” |
|
|
Radio communication at uncontrolled airports |
|
|
References:
1 An example of this is where the approach facility such as an NDB or VOR is located at the airport.
G