.jpg)


CIRCUIT TRAINING—TAKEOFFS, THE CIRCUIT, AND LANDINGS
CIRCUIT
Aim
Students must demonstrate the ability to operate the aircraft in a safe manner in the vicinity of a controlled and/or uncontrolled aerodrome.
Description
You will be required to demonstrate correct circuit procedures, including departure and joining procedures for both controlled and uncontrolled aerodromes. When the location of the flight test does not allow demonstration of both uncontrolled and controlled aerodrome circuit procedures, the Examiner will assess by questioning the procedures that are not demonstrated. You must also demonstrate your ability to comply with MF procedures or ATC clearances or instructions while maintaining separation from other aircraft.
Performance Criteria
Private Pilot Students and Commercial Pilot Students must:
- fly an accurate circuit maintaining correct position and separation from other aircraft;
- comply with actual or simulated ATC clearances or instructions;
- comply with circuit entry and departure procedures;
- comply with established circuit patterns;
- transmit the required radio calls;
- correct for wind drift to maintain proper ground track;
- remain oriented with the runway/landing area in use;
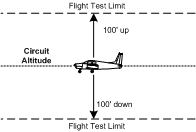
- maintain circuit altitude (±100 feet) and an appropriate airspeed;
- complete appropriate checklists;
- apply the applicable noise abatement and wake turbulence avoidance procedures, as required;
- comply with other procedures that may be in effect at the time.
Discussion
The Circuit
After completing the 500’ checks on departure, a normal circuit (e.g., a RWY 01 departure) requires a left climbing turn onto the “crosswind” leg. The tracking on the ground is 90° from the projected departure centreline, and the heading flown should be adjusted for any crosswind so that this 90-degree track is maintained. When departing from RWY 19, noise abatement prohibits a turn to crosswind below 700’ ASL. To maintain a safe distance from the airport, the crosswind leg when departing RWY 19 should consist of a gentle left turn directly to the downwind leg, although you must be sure, again for noise abatement, you do not fly over the hospital (you should be just east of the hospital).
Remember that throughout the crosswind leg, right rudder should be inputted sufficiently to centre the ball (required whenever the aircraft is in a climb attitude).
The turn onto the downwind leg should be initiated approximately 200’ below circuit altitude. So that you do not take from the lift required for the climb, a gentle turn should be used. Before turning, however, check for any traffic that may be entering the circuit straight in on the downwind leg. The rate of turn here should also be timed so that the aircraft is level at circuit altitude when the downwind turn is completed and the aircraft is travelling parallel to the runway. Climbing or descending in the downwind leg is prohibited. The levelling should conform to “AAPT”— i.e., attitude (cruise), airspeed, power, and then trim. The power selected should be generally 2250 RPM, but do not waste time trying to pinpoint this setting; instead, set the power between the “20” and the “25” on the RPM indicator. Quickness is important here because the downwind leg is a busy time requiring cockpit checks and radio work. Never, however, proceed with your pre-landing checks until the aircraft speed has stabilized and the trim has been set. A properly set trim will ensure the aircraft will remain properly level as you set about your pre-landing activity.
The heading during the downwind leg should be selected to maintain a track that is parallel to the runway (correcting, again, for any crosswind). The distance from the runway should be sufficiently close to make the landing area in the event of an engine failure, but this is not always possible when the circuit is busy (the more aircraft in a circuit generally increases the size of the circuit).
The two general tasks you have to complete—radio work and cockpit check—need not be completed in a particular order. The safety priority, however, is ensuring the pre-landing checks have been completed correctly and accurately. Most students find it easiest to complete the pre-landing checks first, allowing a more uninterrupted time to concentrate on traffic and the approach profile. As a rule, the radio work should be accomplished when abeam the mid-runway position. Incidentally, the fuel selector need not be switched every circuit. Never ignore the fuel levels, but it is quite safe to select the alternate tank at half-hour intervals.
You will initially find the workload quite heavy in the downwind leg, as you are required to simultaneously perform three tasks—keep an eye out for traffic, perform your downwind or prelanding checks, and communicate with either the control tower, or the other aircraft (if the control tower is closed). By the time you are ready for your flight test, you must be able to maintain the aircraft within 100’ of the prescribed circuit altitude. Altitude control will initially seem quite a challenge, but you will quickly learn that proper and careful trim is the key, so be sure you practise this and take the time to do this correctly after levelling in the downwind leg.

The descent for landing should be initiated when the runway threshold appears behind the trailing edge of the wing. Begin by retarding the throttle to 1700 RPM (this is a good reference power setting from which you can make later adjustment in accordance with wind and traffic conditions). As the throttle is changed, yaw control with rudder will be required (in this case left rudder), and you must simultaneously make pitch adjustments to keep the aircraft level. Your goal should be not to allow the aircraft to descend from downwind leg until the airspeed decelerates to the initial approach or base leg speed of 80 MPH. After the throttle is reduced to 1700 RPM the right hand should then select the initial flap setting—in most cases 25° flap. Immediately after the flap is set, the right hand should then adjust the trim to maintain the 80 MPH in the descent.
As the aircraft begins to descend, a turn should be maintained from the downwind leg to the base leg. Like the crosswind leg, the tracking should be 90° to the runway. Begin immediately judging the correctness of the glidepath by looking for the ground area that remains fixed in your field of vision.
Avoid chasing the airspeed indicator and instead concentrate generally on flying the correct pitch attitude that will produce 80 MPH, only crosschecking the airspeed indicator periodically. Remember that the glidepath adjustments (i.e., decreasing, or increasing the rate of descent) are made with power adjustments and not pitch (as was the case when you were practising slow flight). Pitch of course controls airspeed. Nevertheless, pitch and power are intertwined with respect to overall performance. If you change the power setting, you will have to make an ever so slight change in pitch whereby a power decrease will require increased nose-down pitch, and a power increase will require increased nose-up pitch. Problems and frustration occur when students make power changes that are too radical—although these too are sometimes unavoidable. You will achieve the greatest success if you adjust your glideslope through the use of early and minimal power changes. Power adjustments, if necessary, are therefore gradual and gentle. This is crucial as it allows the left hand to keep up with pitch adjustments that will produce the correct speed—and, quite simply, correct speed is everything in landing an aircraft properly.
Flight Safety for Circuit Training (link)